|
1. Go to start, then up to settings, then right to control-panels.
2. Find the "Network and Dial-up Connections" control panel. Double
click on it to enter it.
3. Double click on "Make New Connection". You will see the following
screen:
4. Choose "Dial-up to the Internet", and click next.
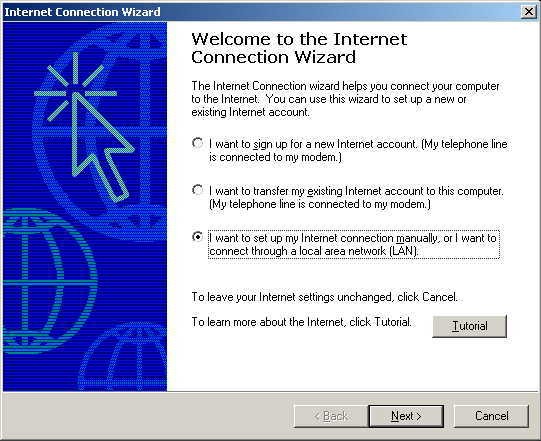
5. You will see this screen:

Pick "I want to set up my Internet connection manually, or I want to
connect through a local area network (LAN)." Then click next.
6. On the next screen, you will be asked "How do you connect to the
Internet?", and you have two choices. The correct choice is "I connect
through a phone line and a modem" which should already be
picked. Click next.
7. The following screen should look like this when completed:
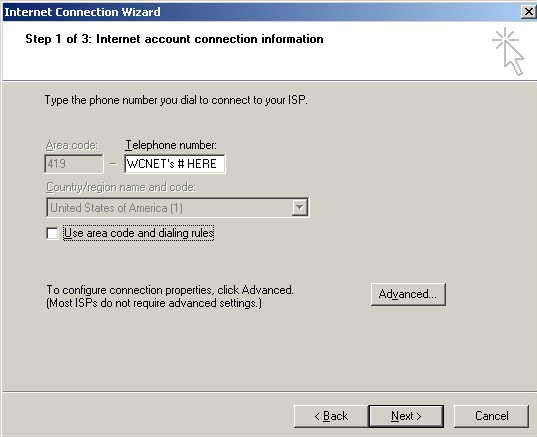
WCNet's local phone number you chose from your
information packet should be filled in in the "Telephone number" blank,
without the area code. Also "Use area code and dialing rules" beneath the
phone number should be unchecked. Click next.
8. In the next screen you will see two blanks, one labeled "User name:",
and one labeled "Password". You should fill in the user name (also called
login name) and password given to you in your information packet in their
respective blanks. Click next.
9. You will now be prompted to name your connection. In the box labeled
"Connection name:" you should type "WCNet 56K". Click next.
10. You will now be asked if you would like to setup an internet mail
account. Choose either yes or no. If you already have an internet mail
account setup in Outlook Express or plan to set one up later you should
choose no, and click finish. If you choose yes, skip ahead to step 11,
now. If you choose no, keep reading.
You should now be back in the "Network and Dial-up Connections" Control
Panel. Find the connection we just created in that folder and click on it
with the RIGHT hand mouse button, then select "Create Shortcut" with the
left mouse button. A box will pop up saying that "Windows cannot create a
shortcut here. Do you want the shortcut to be placed on the desktop
instead?", click yes, and a shortcut to this dial up connection will be
placed on your desktop. At this point you are done, and should not read
any farther.
11. The next screen will give you a choice of "Create a new Internet mail
account, or "Use an existing Internet mail account". You must pick
"Create a new Internet mail account".
12. Next you are prompted for a "Display name:". Please type your first
and last name in the box. Click next.
13. You are then prompted to enter your email address. Your email
address should be the email address assigned to you in your information
packet. If you have more than one, enter the one you prefer.
14. In the next screen you must enter the name of your email
server. There are two blanks, one for incoming and one for outgoing. You
must type "mail.wcnet.org" (without the quotes) in both blanks.
15. Next you are asked for your "Account name", also known as login name,
and "Password". These are both in your WCNet information packet. Click
next.
16. The next screen is the last. You are asked if you would like to
connect to the internet immediately. If you do not want to connect
immediately, uncheck the check-box labeled "To connect to the internet
immediately, select this box and then click finish." Then click finish.
17. You should now be back in the "Network and Dial-up
Connections" Control Panel. Find the connection we just created in that
folder and click on it with the RIGHT hand mouse button, then select
create shortcut with the left mouse button. A box will pop up saying that
"Windows cannot create a shortcut here. Do you want the shortcut to be
placed on the desktop instead?", click yes, and a shortcut to this dial up
connection will be placed on your desktop.
Note that the first time you start Outlook Express, you will be asked if
you want to import previous messages and address books. You need to pick
the option labeled "Do not import at this time", and click next, then
finish.
|
|
|