|
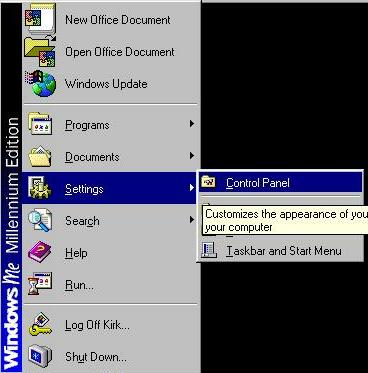
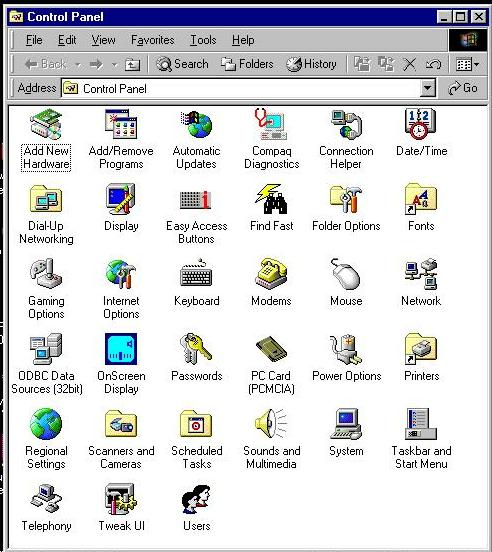
1.Go to start, then up to Settings, then right to Control Panel. Find the Dial- up Networking icon, Left click on this icon.
2. A window will appear that has one or more icons in it. One of them is Make New Connection. Double-click on Make New Connection.
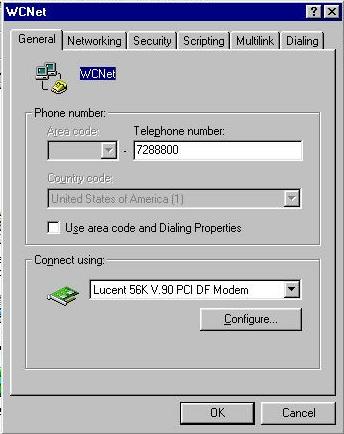
3. Type WCNet for name of computer you are dialing. Your modem should be listed in the box.
4. Click on the Configure button.
5. Under the general tab, your port and modem should already be highlighted, make sure they are correct.
6. Click on the connection tab at the top of that window. Under that tab, data bits should read 8, parity should read none and stop bits should read 1.
7. In call preference section, wait for dial tone before dialing and cancel call if not connected in 60 seconds should both be checked.
8. Click on the advanced button.
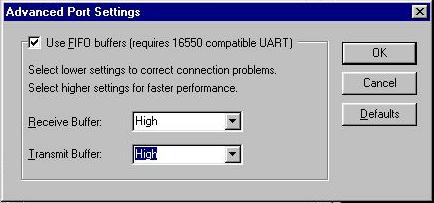
9. For error checking make sure that Compress data is checked. Hardware is checked in the next box. Click on Port Settings; change Transmit buffer from Max to High. ( Buffer Fix )
10. Click ok to close that window, click ok to close the next window, and then click next.
11. Type in the phone number for the WCNet that was provided on your information sheet. Click next, then click finish. This will create a new icon in the dial up networking folder called WCNet.
12. Click on the new connection called WCNet with the right mouse button. A list will appear. In that list, click on properties with the left mouse button.
13. Under the General Tab, Be sure to remove the check from the box next to" Use Area Code and Dialing Properties"
Please use the phone number provided for you if it is different from the example.
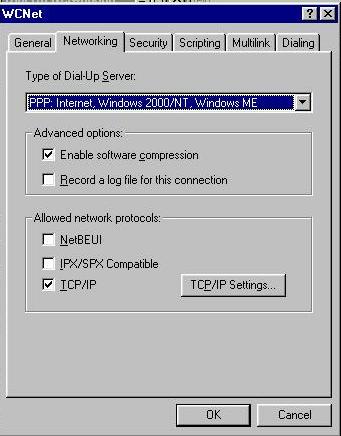
14. Click on the networking tab at the top of that window. Type of dial-up server should read PPP: Internet,Windows 2000 NT,Windows ME
15. Under advanced options make sure that enable software compression is the only thing checked. If it is grayed out, don't worry.
16. Under allowed network protocols, only TCP/IP should be checked.
17. Click on the tcp/ip settings button directly to the right.
18. You want to pick server assigned IP address. Then below that you want to pick server assigned there as well. Click ok to close that window, click ok again.
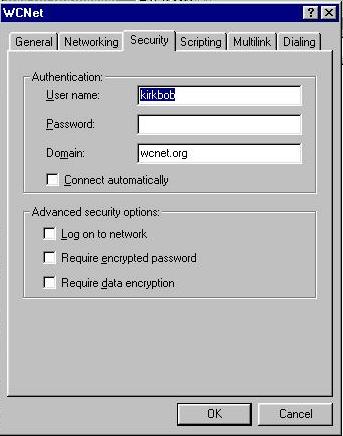
19. Click on Security tab, enter your user name and password, in all lower case letters.
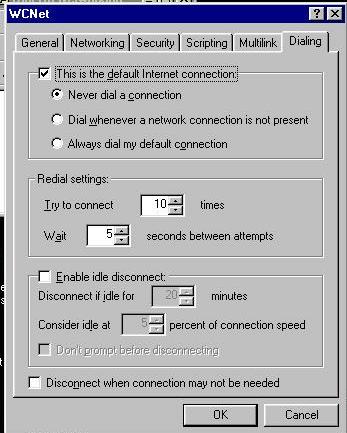
20.Click on Dialing tab. The only part we are concerned about is the redial section. Make sure there is a checkmark in redial. Set the times to try to 25. In the other sections, make sure there isn't a checkmark in either of the disconnect options. There should be a checkmark in this is the default connection and a dot in never dial a connection (you will make the connection using a shortcut to this connection icon). Click ok to accept the changes and close that window.
21. Click on your WCNet icon with the right mouse button again. Click on create shortcut with the left button. Windows will say it Cannot create a shortcut here, do you want it on the desktop instead? Click yes. This will place a shortcut to your WCNet connection on your desktop.
22. Close the dial up networking window by clicking on the X in the top right corner of the window.
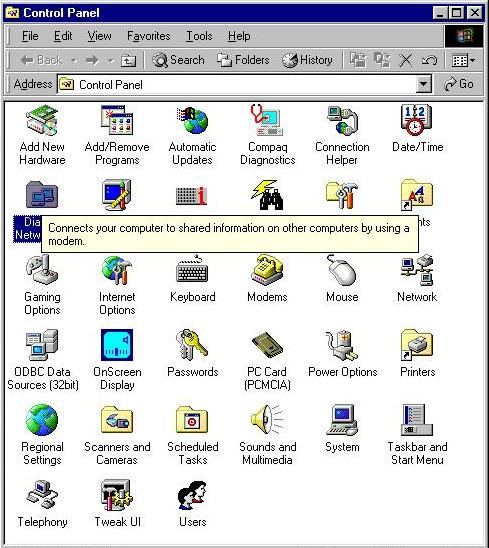
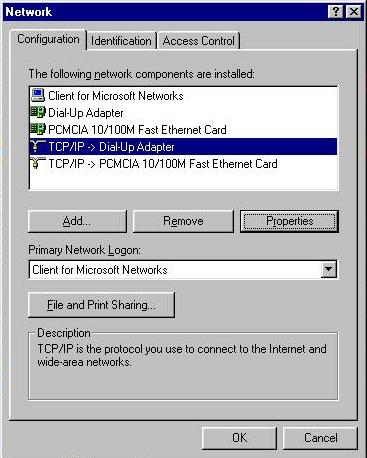
23. In the control panel, double click on the network icon.
24. Make sure that Client for Microsoft Networks is one of the listed components. If it is, you'll have a tab that says identification. (If it isn't, you'll have to add it by clicking on the add button. Then click on clients, then Microsoft, then Client for Microsoft Networks.) Make sure that Client for Microsoft Networks is your primary login, not Microsoft Family Logon. In fact, you should remove MS Family Logon by clicking on it to highlight it and then clicking on the remove button. Click on TCP/IP to highlight it. (If you don't have TCP/IP, you'll have to add it by clicking on the add button and then on protocols. Click on Microsoft on the left side and TCP/IP on the right side). Once TCP/IP is highlighted, click on properties. A window with three tabs will come up.
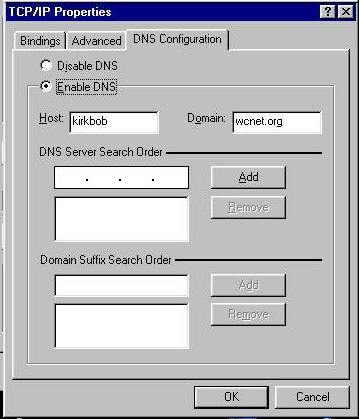
25. Now click on the DNS configuration tab. This will probably come up with disable dns checked. Change it to enable dns.
26. Then click your mouse button in the host box. Type in your login name in all lower case (same thing as username), which is found on the information sheet from WCNet.
27. Next click in the domain box. Type in wcnet.org.
28. Click ok, click ok again, to close out of those 2 windows.
29. Your computer will probably either want the Windows CD to copy files or it will want to restart. Say yes you want to restart. If you added Client for Microsoft Networks and filled out the identification information, a password box will come up when your computer restarts. For name, type in the same name you used in computer name. If you leave the password area blank, this screen will not come back. If you enter a password, you'll have to type it in each time you start your computer. This is a Windows password screen and does not require your WCNet password.
30. Once your computer restarts, double click on Shortcut to WCNet that you placed on the desktop. A dialing window will appear.
31. Make sure your login name from you WCNet info sheet is typed in for name, then type in the password from the info sheet. Both should be typed in lower case only!
32. That's it. If all goes well it will dial, a window will come up saying you have connected, and minimize to a little computer in the task bar near the clock.
34. Double-click on Internet Explorer, Netscape, or another browser, and surf away. One good address to go to right away is www.wcnet.org/help. This will take you to the wcnet helpdesk pages where you can find out much more about how the internet works.
35. When you are done, double click on the icon on the lower right corner of the screen that looks like 2 computers connected together with a wire. A window will appear, and one of the buttons in that window is labeled disconnect. Click on the disconnect button to disconnect from WCNet.
|