These instructions assume that your views of each window are the default
way that XP comes.
You can switch it to classic view, in which case most
of it looks like 98/NT/2000 etc.
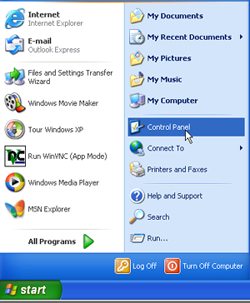
1. Click on the START button in the lower left corner of
the screen.
2. The start button will come up with two categories. Click on the
Control Panel, in the right side category.
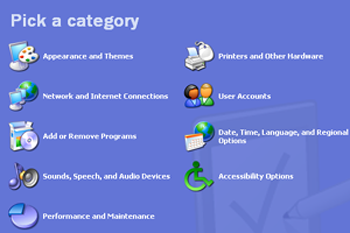
3. When that window comes up click on Network and Internet
Connections. If you don't see it, look for a selection in the top left that says to Switch to Category
view.
4. The next window that opens will have a heading that says Pick
a
task at the top. You want to pick the first entry called
Set up or change your internet connection.
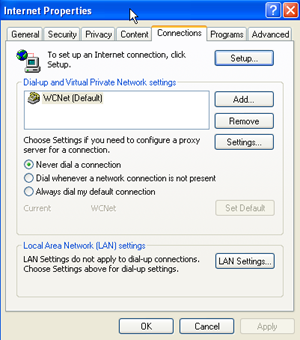
5. A new window titled Internet Properties will
appear. Click on the setup button near the top right.
6. If this is the first time you have done this, a window will come up
that asks you for location information. If you do not get this window,
skip to step 7.
The first of two things you need to check in this window is that the
blank below What area code (or city code) are you in
now?
has your area code filled in. It will not let you close the window until
you have filled in the area code. The second is whether or not you have
tone or pulse dialing. It defaults to tone, so for most people this will
be fine. Once you have checked both of those, click the
OK
button. Another window will come up, click the OK button
again.
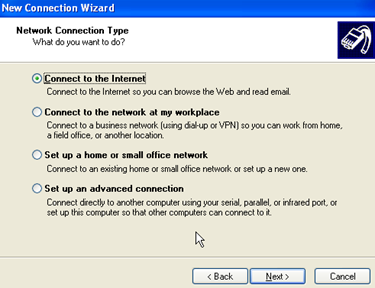
7. The next window should be titled New Connection
Wizard
and says Welcome to the New Connection Wizard. Click
Next
8. On the following screen you will be given four choices as to what kind
of connection to setup. The first, Connect to the
Internet
is the default and should have a dot to the left of it already. That is
the correct choice, so click Next.
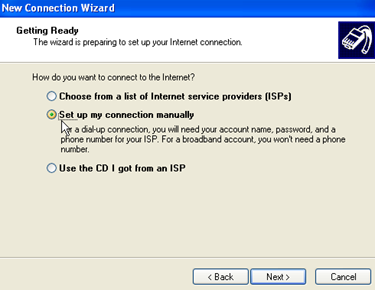
9. You are given 3 choices on the next screen. Click on the middle
choice which says Set up my connection manually. A dot
should appear beside that choice. Click Next.
10. The next window asks you How do you want to connect to the
Internet? The correct choice Connect using a dial up
modem should already be checked, so hit Next.
11. Next it will ask for an ISP Name.
type: WCNet. Click Next.
12. Next it will ask for your phone number. Please fill in a local phone
number from the list of access numbers provided to you in your WCNet
information packet. Due to the new dialing rules coming
into effect on December 1, 2001, make sure you include your
area code with the telephone number you are entering, taking
care NOT to precede it with a 1 which would mean long
distance dialing. Please note that WCNet cannot be held
responsible for any long distance charges incurred if you select a long
distance phone number. Click Next.
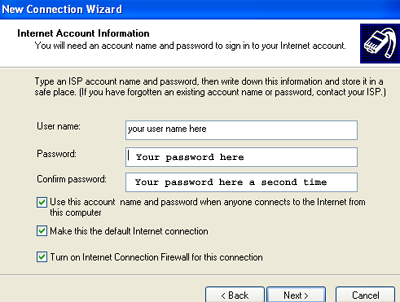
13. Next you will be asked for your user information. This is also found in the WCNet information packet. Enter your user name (may
also be called login name), and your password in the appropriate blanks. You must type your password twice, once in each blank and
correctly both times, before it will accept your password. Also, these are case sensitive, so make sure you type them all in lower
case. Leave the three boxes checked on the bottom of the screen. Click Next.
14. This is the final screen of the connection wizard, titled
Completing the New Connection Wizard. Toward the bottom
is a blank that you may check that says Add a shortcut to this
connection to my desktop. click on it so it's checked, and click
Finish.
15. Finally, close the window that you are currently in by clicking on
the X in the top right corner so you are back to the Windows XP desktop.
You should now have a WCNet icon on your desktop. In the
future, to dial in to WCNet for internet access, double click on that
icon. Please make sure to disconnect when you are done to allow others to
connect should the line get busy during prime time hours.
16. Double click on the wcnet icon. Click on the Properties
at the bottom of the window.
17. Click on the Networking tab.
18. Highlight Internet Protocol (TCP/IP)
Click on the Properties button.

19. Click in the circle next to Use the following DNS server addresses
enter the following numbers for the Preferred DNS server and the Alternate DNS
server: 64.31.64.1 and 64.31.64.2
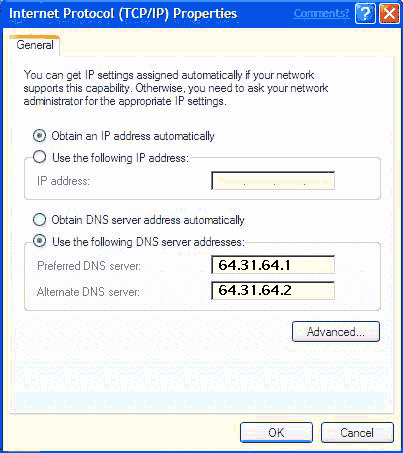
20. Click onthe OK button
21. Put a check in box next to Client for Microsoft Networks
Then click on the OK button.

22. If you wish to get online right now click on the Dial button,
otherwise click on Cancel.
If you would like to setup email for WCNet with Outlook Express now,
please continue.
1. Double click on the WCNet icon on your desktop to dial in to
WCNet. Of course, if you are on the phone currently you will have to skip
to step 2.
2. Click on the START button. Go up in the first
column
and click on E-Mail, Outlook Express.
3. On this first screen, fill in your full name. Click
Next.
4. On the next screen fill in your email address. Click
Next.
5. On this screen you are asked for the Incoming mail (POP3,
Imap, or HTTP) server and for an Outgoing mail
(SMTP) server. Fill in both blanks with:
mail.wcnet.org Click Next.
6. On this screen you will need your user name (or login name)
from your WCNet information packet. Type that name in the
Account name blank. Type your password in the Password blank.
These are case sensitive, so make sure you type them in all lower case.
Click Next.
7. It will then say you have successfully completed. Click the finish
button, and you're done.
To access email in the future, follow step 1 (to dial in to WCNet) then
step 2 (to open Outlook Express) and retrieve your email.
To see more XP configuration screens, click here
|